
Soft Centred Dark Chocolate Cake with Vanilla Ice Cream and Salted Caramel
Prefer not to cook?
Order one of our ready-made meals and get it delivered to your door.
Browse our meals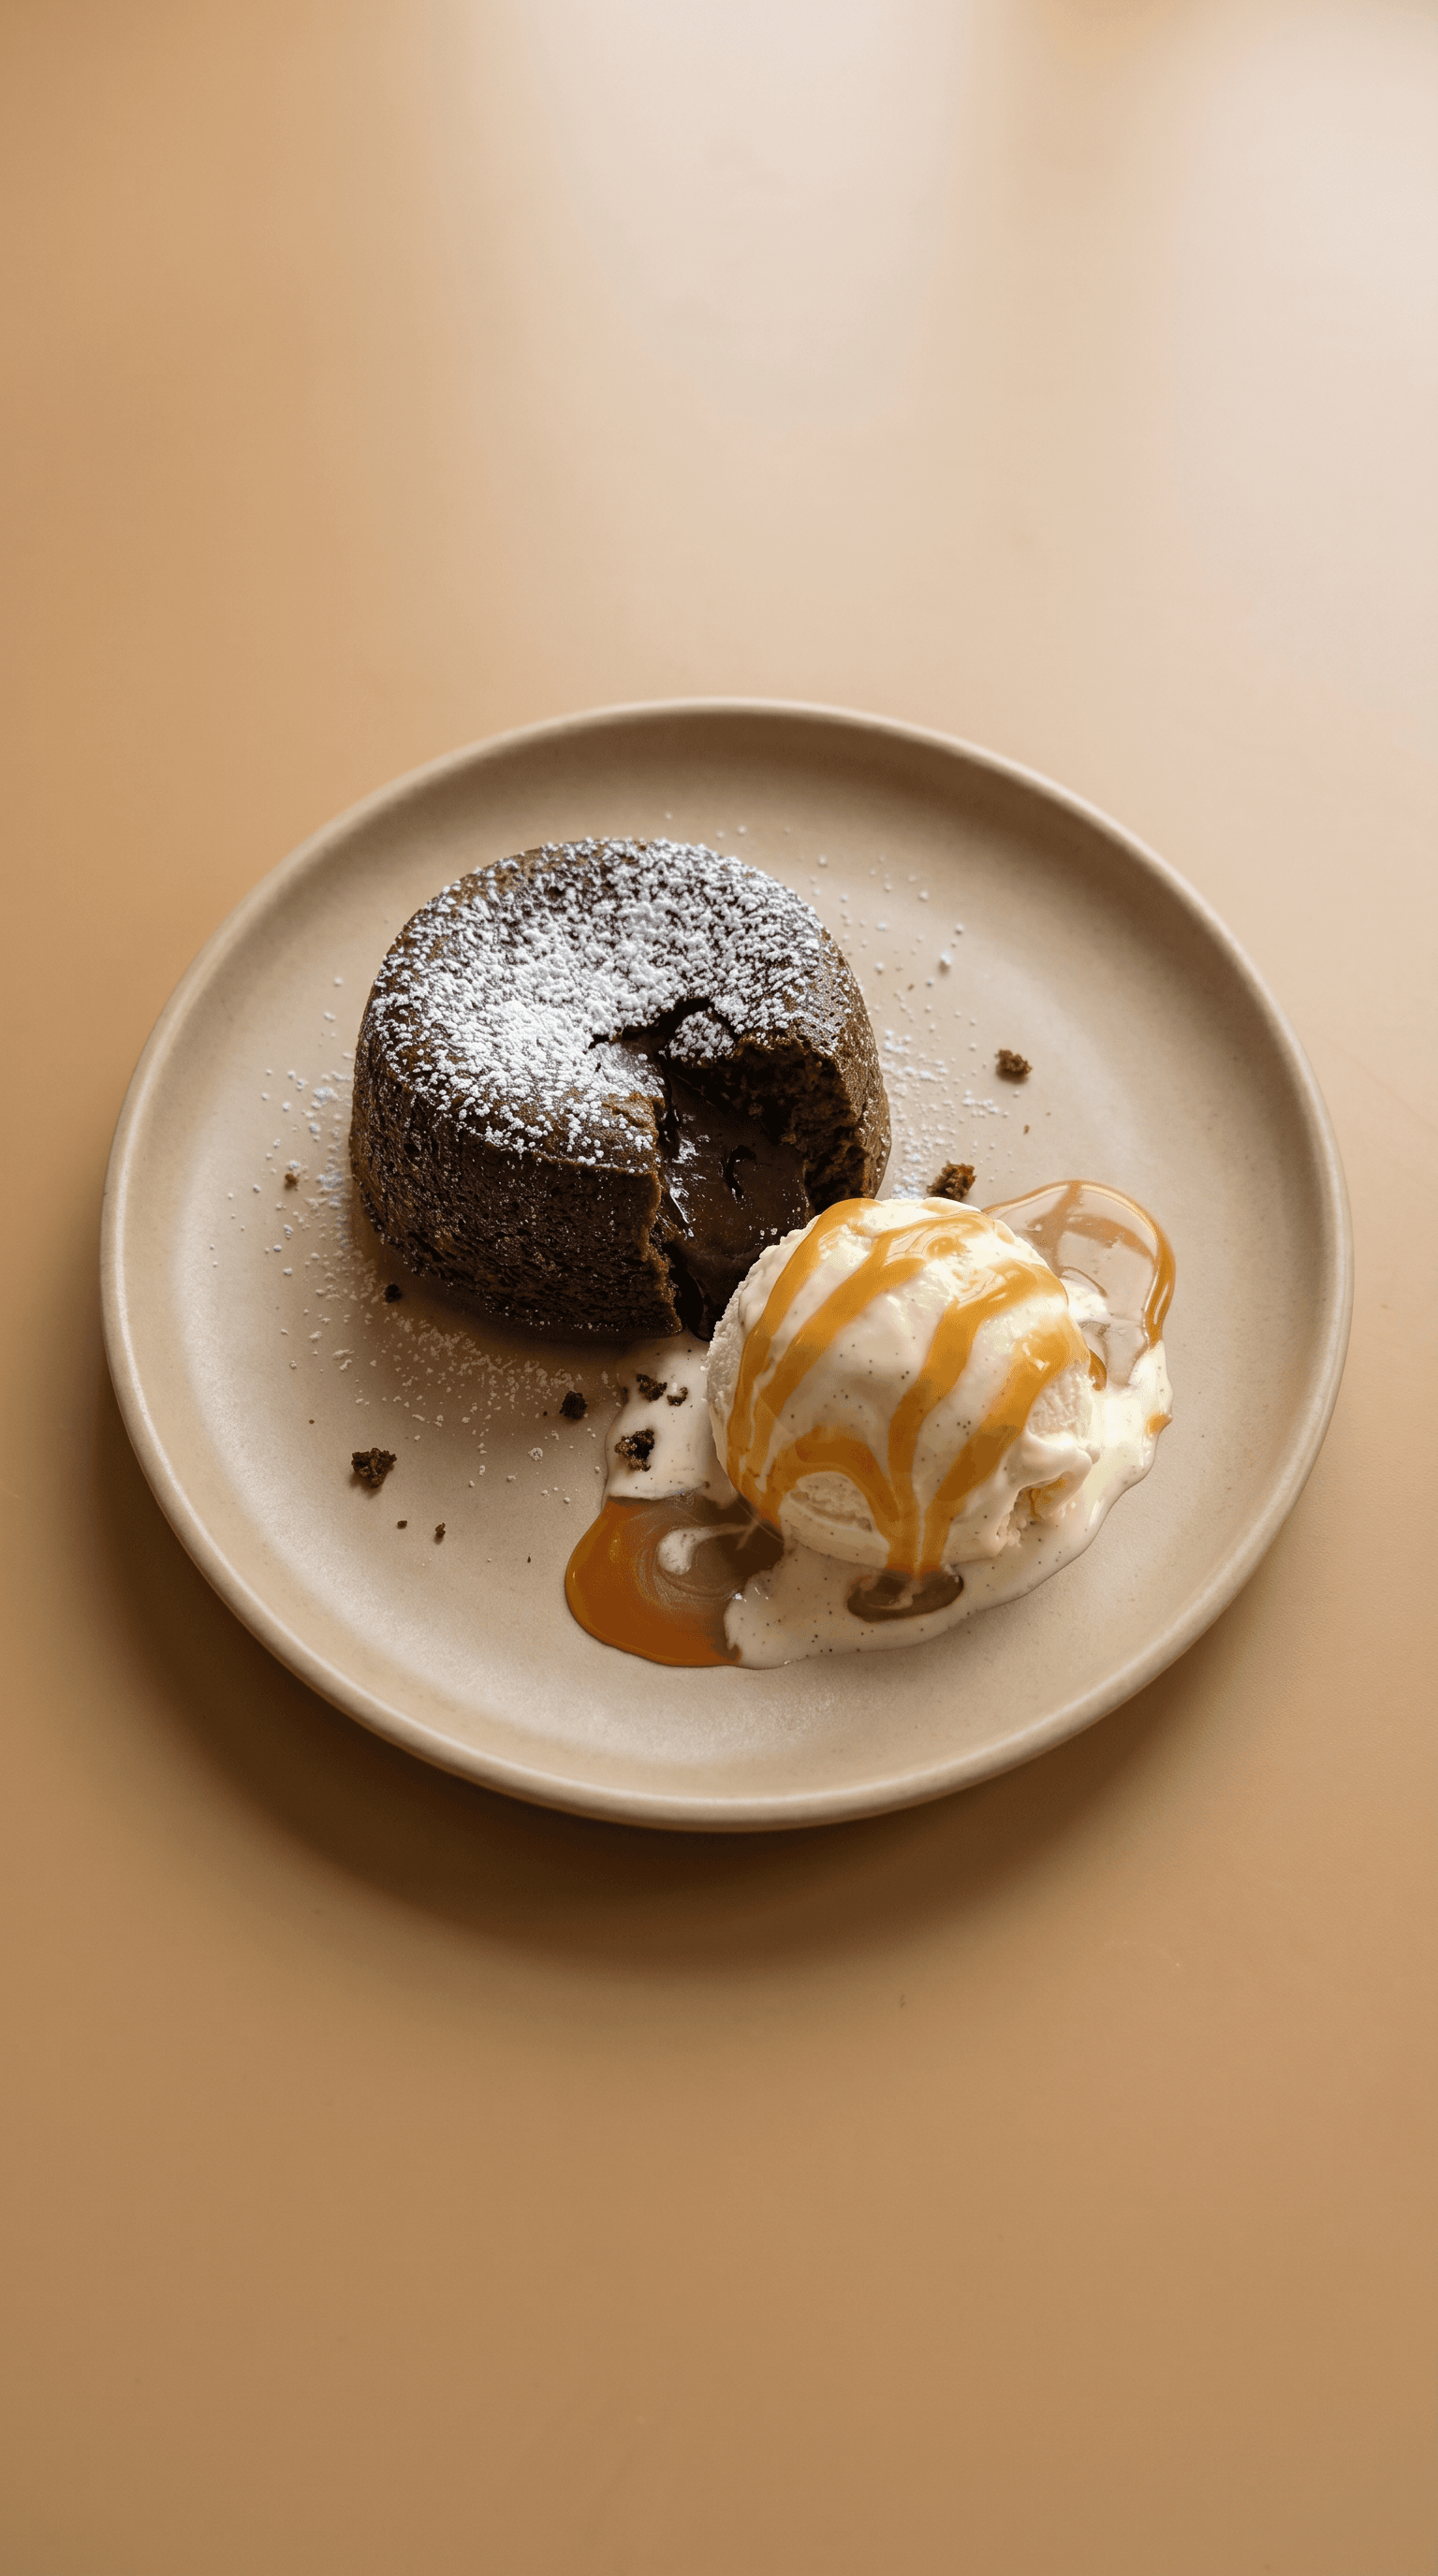
This classic French bistro dessert features a warm chocolate cake with a molten center, paired with homemade vanilla ice cream and silky salted caramel. You'll master three professional techniques—crème anglaise, sugar caramelization, and the perfect molten center—in about 90 minutes. Serves 4 and makes an impressive dinner party finale.

Recipe by Christophe Rammant
Christophe is a culinary professional with expertise in French and global cuisine. He has developed recipes and cooking techniques that bridge traditional methods with modern home cooking approaches. Christophe focuses on making classic culinary techniques accessible to home cooks through clear instruction and practical applications. He studied at Le Cordon Bleu Paris and has work experience at a two star Michelin restaurant.
Cordon Bleu Paris alumni - Two star Michelin kitchen experience
Quick Info
What Makes This Cake Stay Molten in the Center?
Professional pastry chefs know the secret is precise timing and temperature. Baking at 180°C / 350°F for exactly 9-10 minutes sets the outer edges while the center stays liquid. The high ratio of chocolate to flour creates a fudgy texture that won't dry out.
Traditional French technique uses a bain-marie to melt the chocolate gently. This prevents the chocolate from seizing or burning, which would make the batter grainy instead of silky smooth.
Food science shows that the contrast of temperatures—warm cake against cold ice cream—creates a sensory experience that makes each component taste more intense. The lime zest adds a bright acidic note that cuts through the richness and keeps your palate from getting tired.
Estimated nutrition per serving
Estimated from ingredient weights, not lab-tested.
- Calories
- 1043
- Protein
- 14g
- Fat
- 66g
- Carbohydrates
- 102g
Ingredients
Recipe yields 4 servings
For the Chocolate Cake
| Amount | Ingredient | Notes |
|---|---|---|
| 125 g (about 4.5 oz) | dark chocolate | 64% cocoa solids recommended |
| 90 g (6 tablespoons) | butter | — |
| 150 g (3 whole eggs) | eggs | approximately 50 g each |
| 110 g (½ cup plus 1 tablespoon) | sugar | — |
| 40 g (⅓ cup) | flour | sifted |
For the Vanilla Ice Cream
| Amount | Ingredient | Notes |
|---|---|---|
| 200 g (200 ml / ¾ cup plus 1 tablespoon) | whole milk | — |
| 50 g (50 ml / 3 tablespoons) | whipping cream | — |
| 60 g (3 yolks) | egg yolks | — |
| 55 g (¼ cup) | sugar | — |
| to taste | vanilla powder | or 1 vanilla bean, scraped |
For the Salted Caramel Sauce
| Amount | Ingredient | Notes |
|---|---|---|
| 100 g (½ cup) | sugar | — |
| 30 g (1 tablespoon) | glucose syrup | — |
| 50 g (50 ml / 3 tablespoons) | water | — |
| 100 g (100 ml / ⅓ cup plus 1 tablespoon) | whipping cream | warmed |
| 50 g (3 tablespoons) | lightly salted butter | — |
| to taste | fleur de sel | a generous pinch |
For Garnish
| Amount | Ingredient | Notes |
|---|---|---|
| 30 g (3 tablespoons) | pistachios | blanched and chopped |
| for garnish | dark chocolate drops | — |
| 1 unit | lime | for zest only |
Instructions
Make the Vanilla Ice Cream (Can Be Done 1-2 Days Ahead)
- 1
Temper the Egg Yolks
Whisk the egg yolks and 55 g sugar in a bowl until pale and thick. In a saucepan, heat the milk, cream, and vanilla powder to just below a simmer—around 80°C / 175°F. Slowly pour the hot milk into the yolks while whisking constantly. This gradual warming prevents the eggs from scrambling and creates a smooth base.
- 2
Cook the Crème Anglaise
Pour the mixture back into the saucepan and cook over medium-low heat, stirring constantly with a wooden spoon. Heat to 82-85°C / 180-185°F until it thickens enough to coat the back of the spoon—when you draw a line through it with your finger, it should stay clean. This gentle cooking creates the silky custard texture.
- 3
Chill and Churn
Strain the custard through a fine sieve into a clean bowl and cool completely in the refrigerator for at least 4 hours or overnight. Chilling thoroughly before churning creates smaller ice crystals for a smoother texture. Churn in your ice cream maker according to manufacturer instructions, then freeze until serving time.
Prepare the Salted Caramel Sauce (Can Be Made 3 Days Ahead)
- 4
Caramelize the Sugar
Combine 100 g sugar, glucose, and water in a heavy-bottomed saucepan. Cook over medium heat without stirring until it reaches a deep amber color—around 180°C / 355°F. The glucose prevents crystallization and keeps the caramel smooth. Watch carefully as it can burn quickly once it starts to color.
- 5
Add the Cream and Butter
Remove from heat and carefully whisk in the warm cream—it will bubble vigorously, so stand back. The warm cream stops the cooking immediately and prevents the sugar from hardening into lumps. Whisk in the salted butter and a pinch of fleur de sel until glossy and smooth. Let cool slightly before serving.
Make the Chocolate Cakes
- 6
Melt the Chocolate and Butter
Set up a bain-marie by placing a heatproof bowl over a saucepan of barely simmering water. Add the 125 g dark chocolate and 90 g butter, stirring occasionally until completely melted and smooth. The gentle indirect heat prevents the chocolate from seizing or developing a grainy texture. Remove from heat and let cool slightly.
- 7
Prepare the Batter
In a separate bowl, whisk the 3 whole eggs and 110 g sugar until light and pale—about 3-4 minutes. This incorporates air that helps create the cake's tender texture. Gently fold in the melted chocolate mixture, then sift in the 40 g flour and fold just until combined. Folding instead of stirring preserves those air bubbles for a lighter cake.
- 8
Fill the Moulds
Grease four 6 cm ring moulds with butter and line with parchment paper strips. Fill each mould until 1 cm from the top—this leaves room for the cake to rise slightly without overflowing. The batter can be refrigerated at this stage for up to 4 hours if making ahead.
- 9
Bake to Perfection
Preheat your oven to 180°C / 350°F. Bake for exactly 9-10 minutes—the tops should look set and dull, but when you gently wobble the tray, the centers should still jiggle slightly. This precise timing is what keeps the center molten while the edges set. Even 1-2 minutes extra will cook the center through.
- 10
Rest and Unmould
Let the cakes rest in their moulds for exactly 1 minute after removing from the oven. This brief rest allows the structure to stabilize just enough so they don't collapse when you remove the rings. Carefully lift off the moulds and peel away the parchment paper.
Plate and Serve
- 11
Create the Presentation
Scatter crushed pistachios on each plate to create a textured base that prevents the cake from sliding. Place a warm cake on top. Using two spoons, shape the vanilla ice cream into an elegant oval 'quenelle' and place it on top of the cake. The contrast between the warm molten center and cold ice cream is what makes this dessert spectacular.
- 12
Finish with Garnishes
Drizzle the warm salted caramel sauce around the plate and over the ice cream. Scatter a few dark chocolate drops and finish with fresh lime zest grated directly over the top. The bright citrus cuts through the richness and adds a surprising fresh note that keeps each bite interesting.
The weekly recipe note
Enjoyed this recipe? Get the next one first.
One new recipe each week from Christophe: global flavor, French technique, and practical home-cook timing.
Tips & Tricks
your caramel sauce is grainy or crystallized:
This happens when sugar crystals fall back into the syrup. The glucose in the recipe prevents this, but if it still happens, add a tablespoon of water and reheat gently while stirring until smooth again.
your caramel seizes into hard lumps when you add the cream:
Always warm your cream before adding it to the hot sugar. Cold cream causes thermal shock that hardens the sugar instantly. If it happens, keep whisking over low heat—the lumps will eventually melt back into the sauce.
your cake center is cooked through instead of molten:
Reduce baking time by 1-2 minutes next time. Every oven runs differently, and even 60 seconds makes the difference between a molten center and a regular cake. The center should still jiggle when you gently shake the pan.
your ice cream is icy instead of creamy:
Make sure you chill the custard base completely before churning—at least 4 hours or overnight. Churning cold custard creates smaller ice crystals for that smooth, professional texture. Also, don't skip the straining step, which removes any cooked egg bits.
your cakes stick to the moulds:
Use both butter and parchment paper. The high chocolate and sugar content makes these very sticky. Let them rest for the full minute after baking—this helps them release more easily.
you don't have ring moulds:
Use a muffin tin instead, filling each cup only halfway. The baking time will be similar, but watch carefully as the smaller surface area may cook slightly faster. You'll still get that molten center.
Frequently Asked Questions
Can I make the batter ahead of time?
Yes! Prepare the batter and fill the moulds up to 4 hours in advance. Keep them refrigerated, but let them sit at room temperature for 20 minutes before baking. If you bake them straight from the fridge, add 1-2 minutes to the baking time to account for the cold batter.
What if I don't have an ice cream maker?
Buy high-quality vanilla bean ice cream instead. To elevate it, let it soften slightly, fold in extra vanilla bean paste or scraped vanilla pod, and re-freeze before serving. This mimics the homemade texture and gives you control over the vanilla intensity.
Why is my caramel sauce grainy?
Graininess happens when sugar crystals splash onto the pan sides and fall back into the syrup, causing a chain reaction. The glucose syrup in this recipe acts as an interfering agent to prevent crystallization. Never stir the sugar while it's cooking—just swirl the pan gently if needed.
How do I know when the cake is perfectly done?
The top should look dull and set, not shiny. When you gently wobble the baking tray, the very center should still have a slight jiggle—like barely-set Jell-O. It will continue to firm up during the 1-minute resting period, so don't overbake.
Can I use milk chocolate instead of dark chocolate?
You can, but the result will be much sweeter and less sophisticated. The 64% dark chocolate provides a bittersweet depth that balances the sweet caramel and ice cream. If you prefer less intensity, try 55-60% dark chocolate as a compromise.
How far ahead can I make the caramel sauce?
Make it up to 3 days ahead and store covered in the refrigerator. Reheat gently in the microwave or in a bowl over simmering water, stirring until smooth and pourable. It thickens when cold but returns to the perfect consistency when warmed.
What's the purpose of the lime zest?
The bright citrus cuts through all the richness and prevents palate fatigue. It's a classic French technique—adding an acidic element to balance sweet, fatty desserts. The lime also enhances the chocolate flavor by providing contrast.
Can I freeze the baked cakes?
Not recommended. The magic of this dessert is the molten center, which doesn't survive freezing and reheating well. However, you can freeze the unbaked batter in the moulds for up to 1 month. Bake directly from frozen, adding 2-3 minutes to the baking time.
Recipe Reviews
No reviews yet — Be the first to review this recipe!
The weekly recipe note
Enjoyed this recipe? Get the next one first.
One new recipe each week from Christophe: global flavor, French technique, and practical home-cook timing.
By signing up, you agree to receive emails from Mr. Saucy.
More Recipes You May Like
Swipe to explore
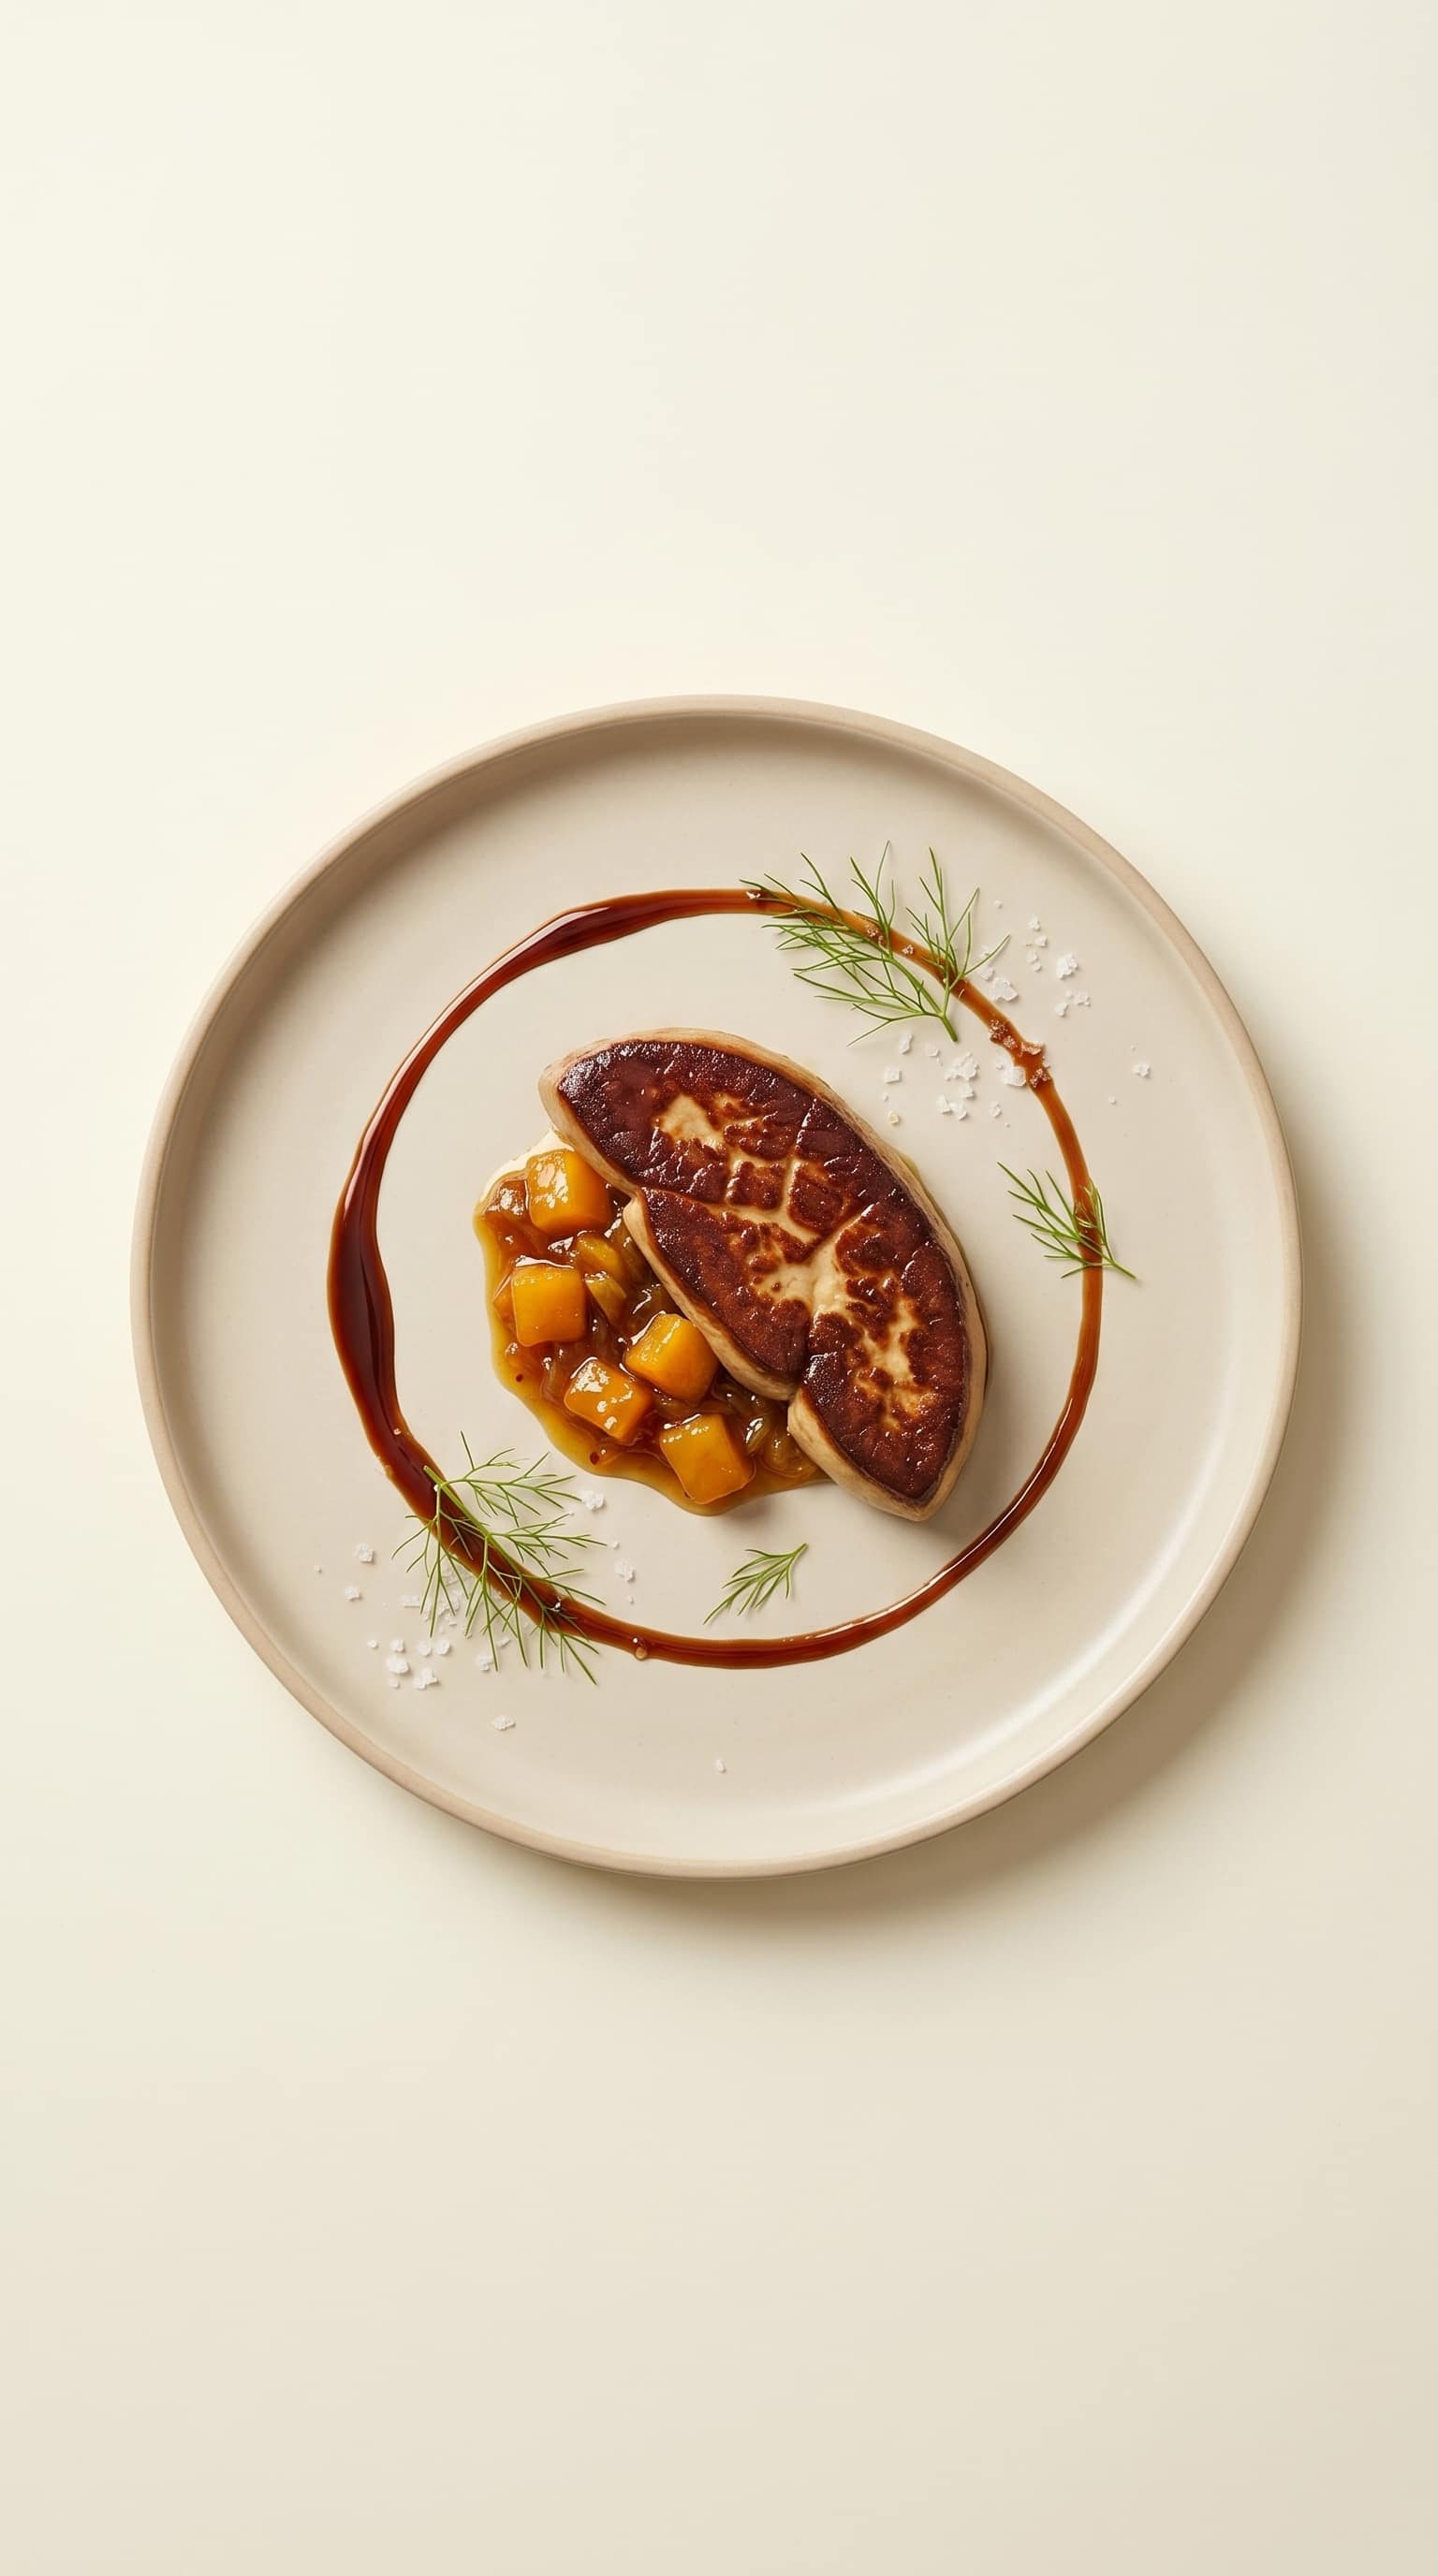
Seared Foie Gras with Mango Ginger Chutney and Star Anise Jus
This classic French appetizer pairs a perfectly seared foie gras escalope with a sweet-tangy mango ginger chutney and a fragrant star anise jus. The secret is a smoking-hot dry pan and just 60 to 75 seconds of total cooking time. Serves 6 as a starter and comes together in about one hour.
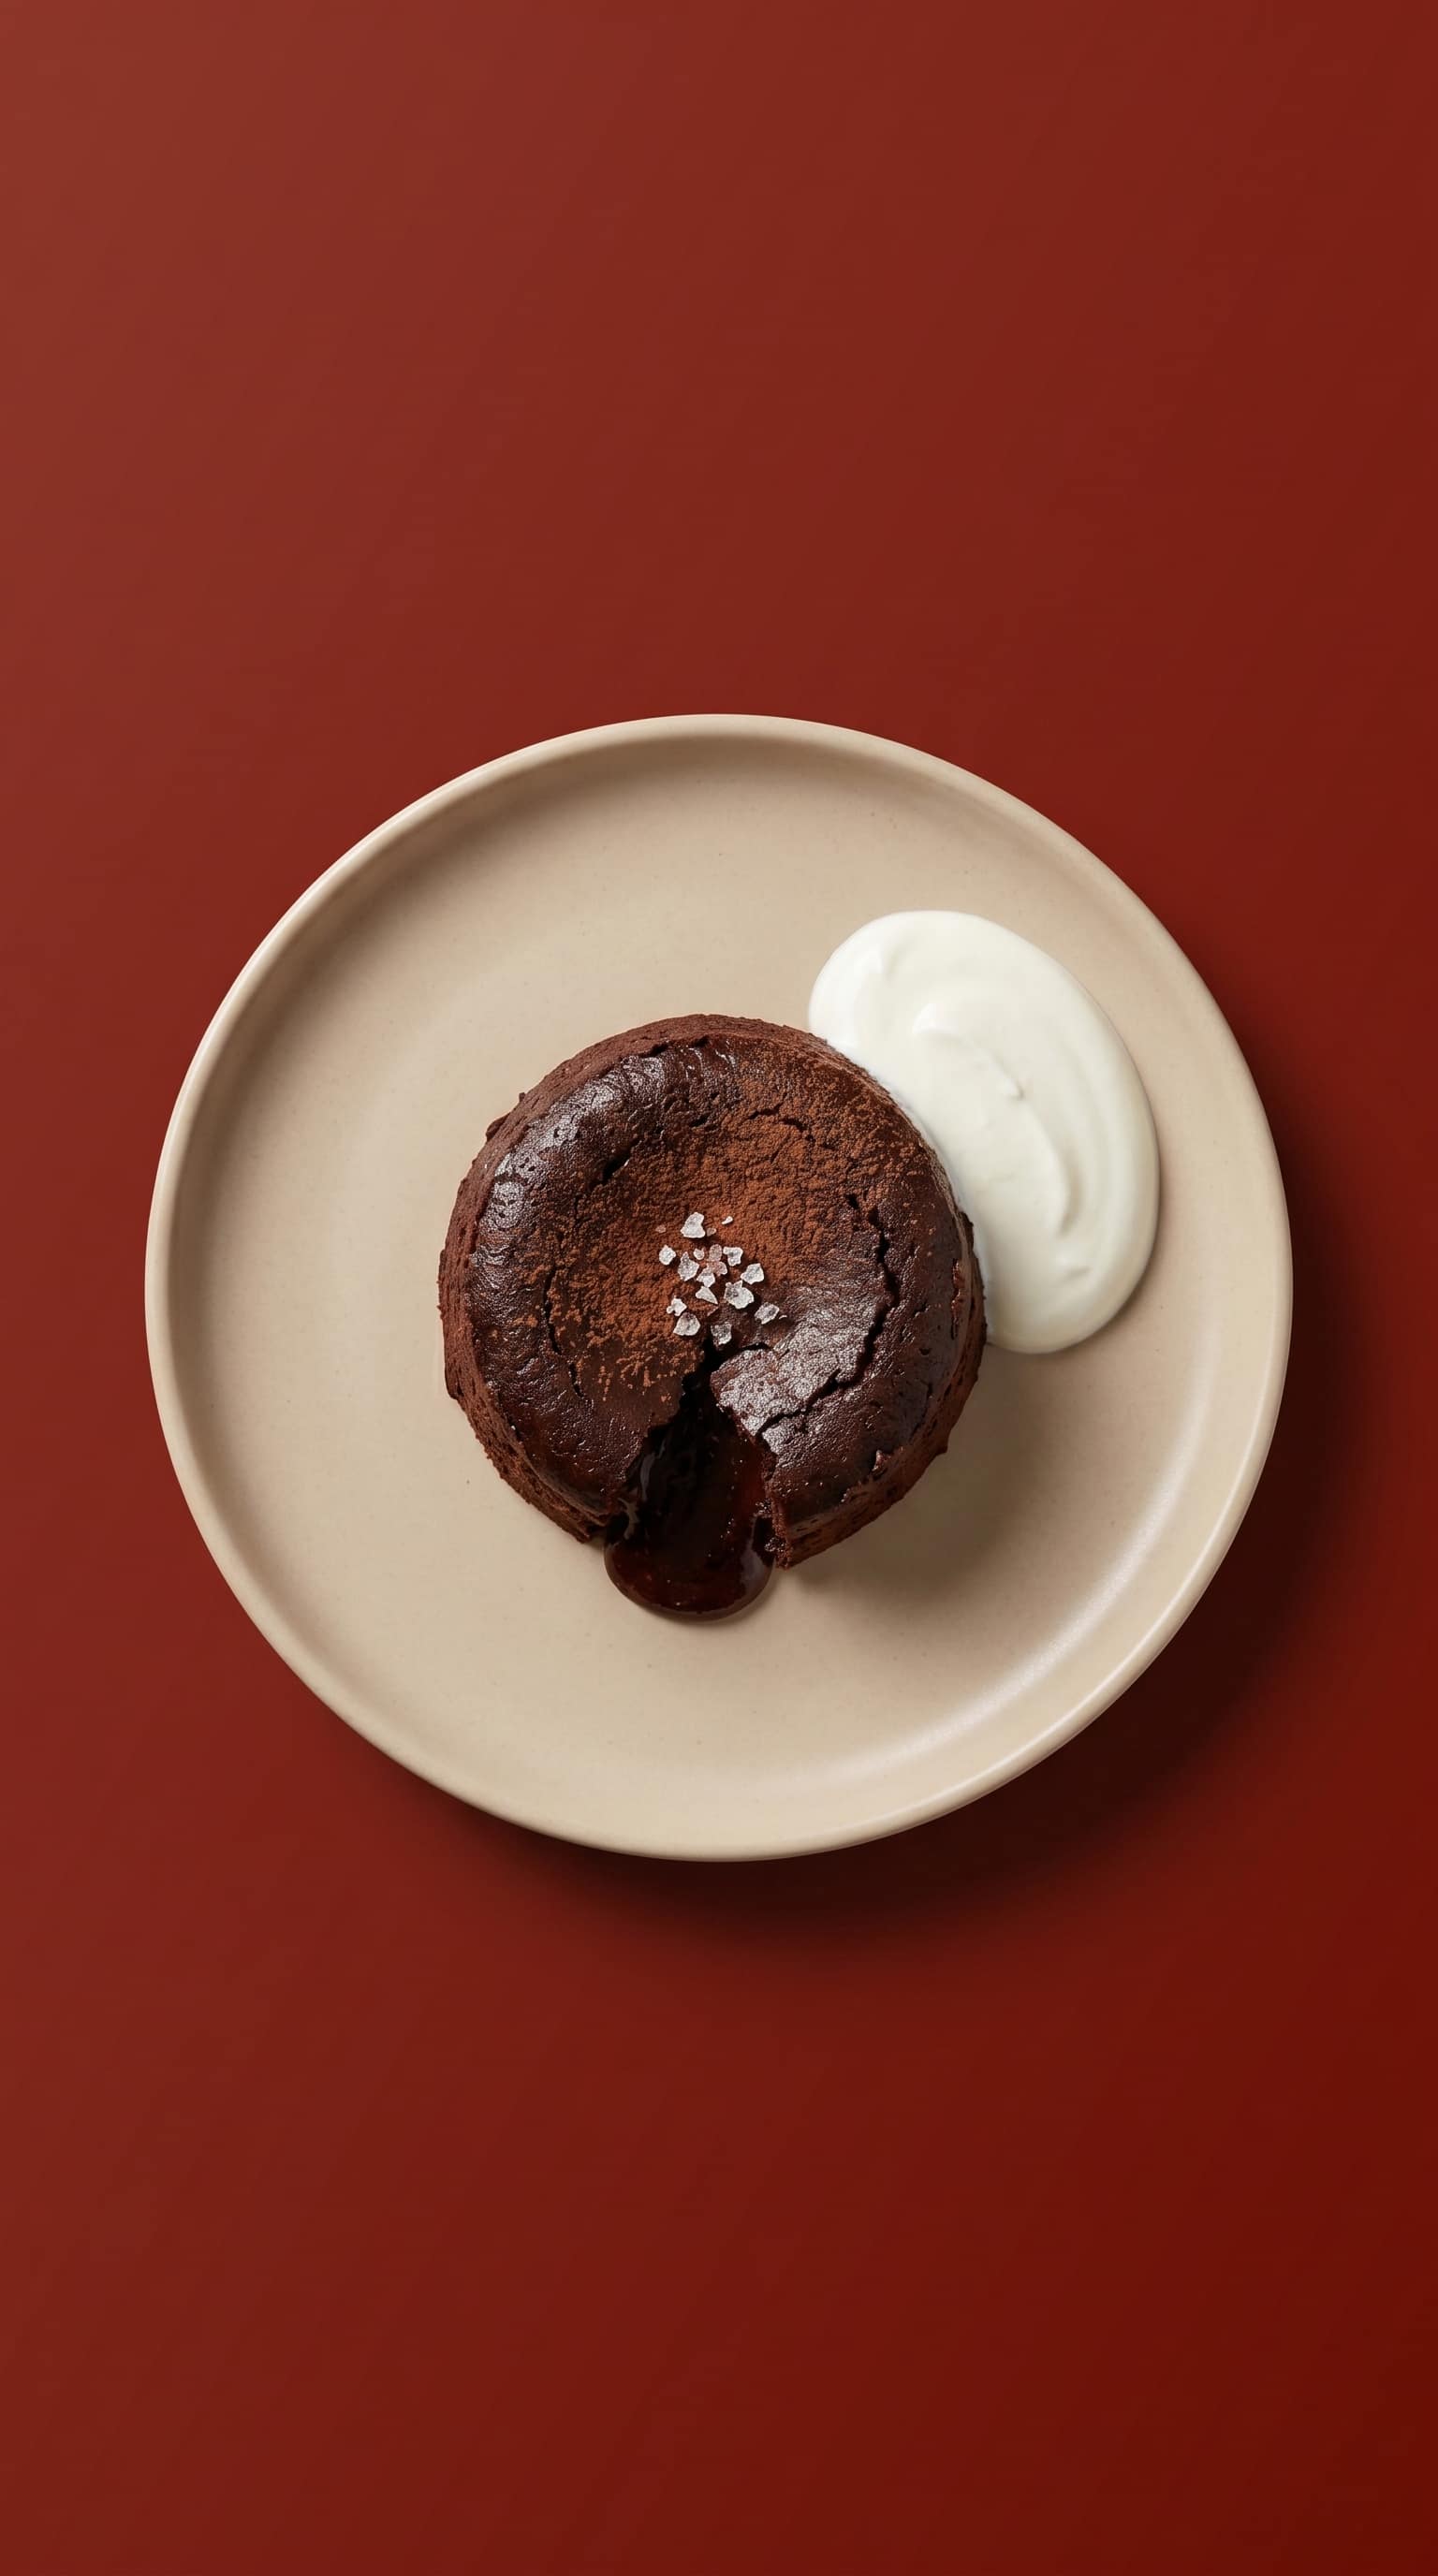
Moelleux au Chocolat, a Classic French Molten Chocolate Cake with Yuzu
This classic French molten chocolate cake has a perfectly set outside and a warm, runny center. A single tablespoon of yuzu juice lifts the rich chocolate with a bright, floral citrus note. Make the batter up to a day ahead and bake in just 10 to 12 minutes. Serves 4.
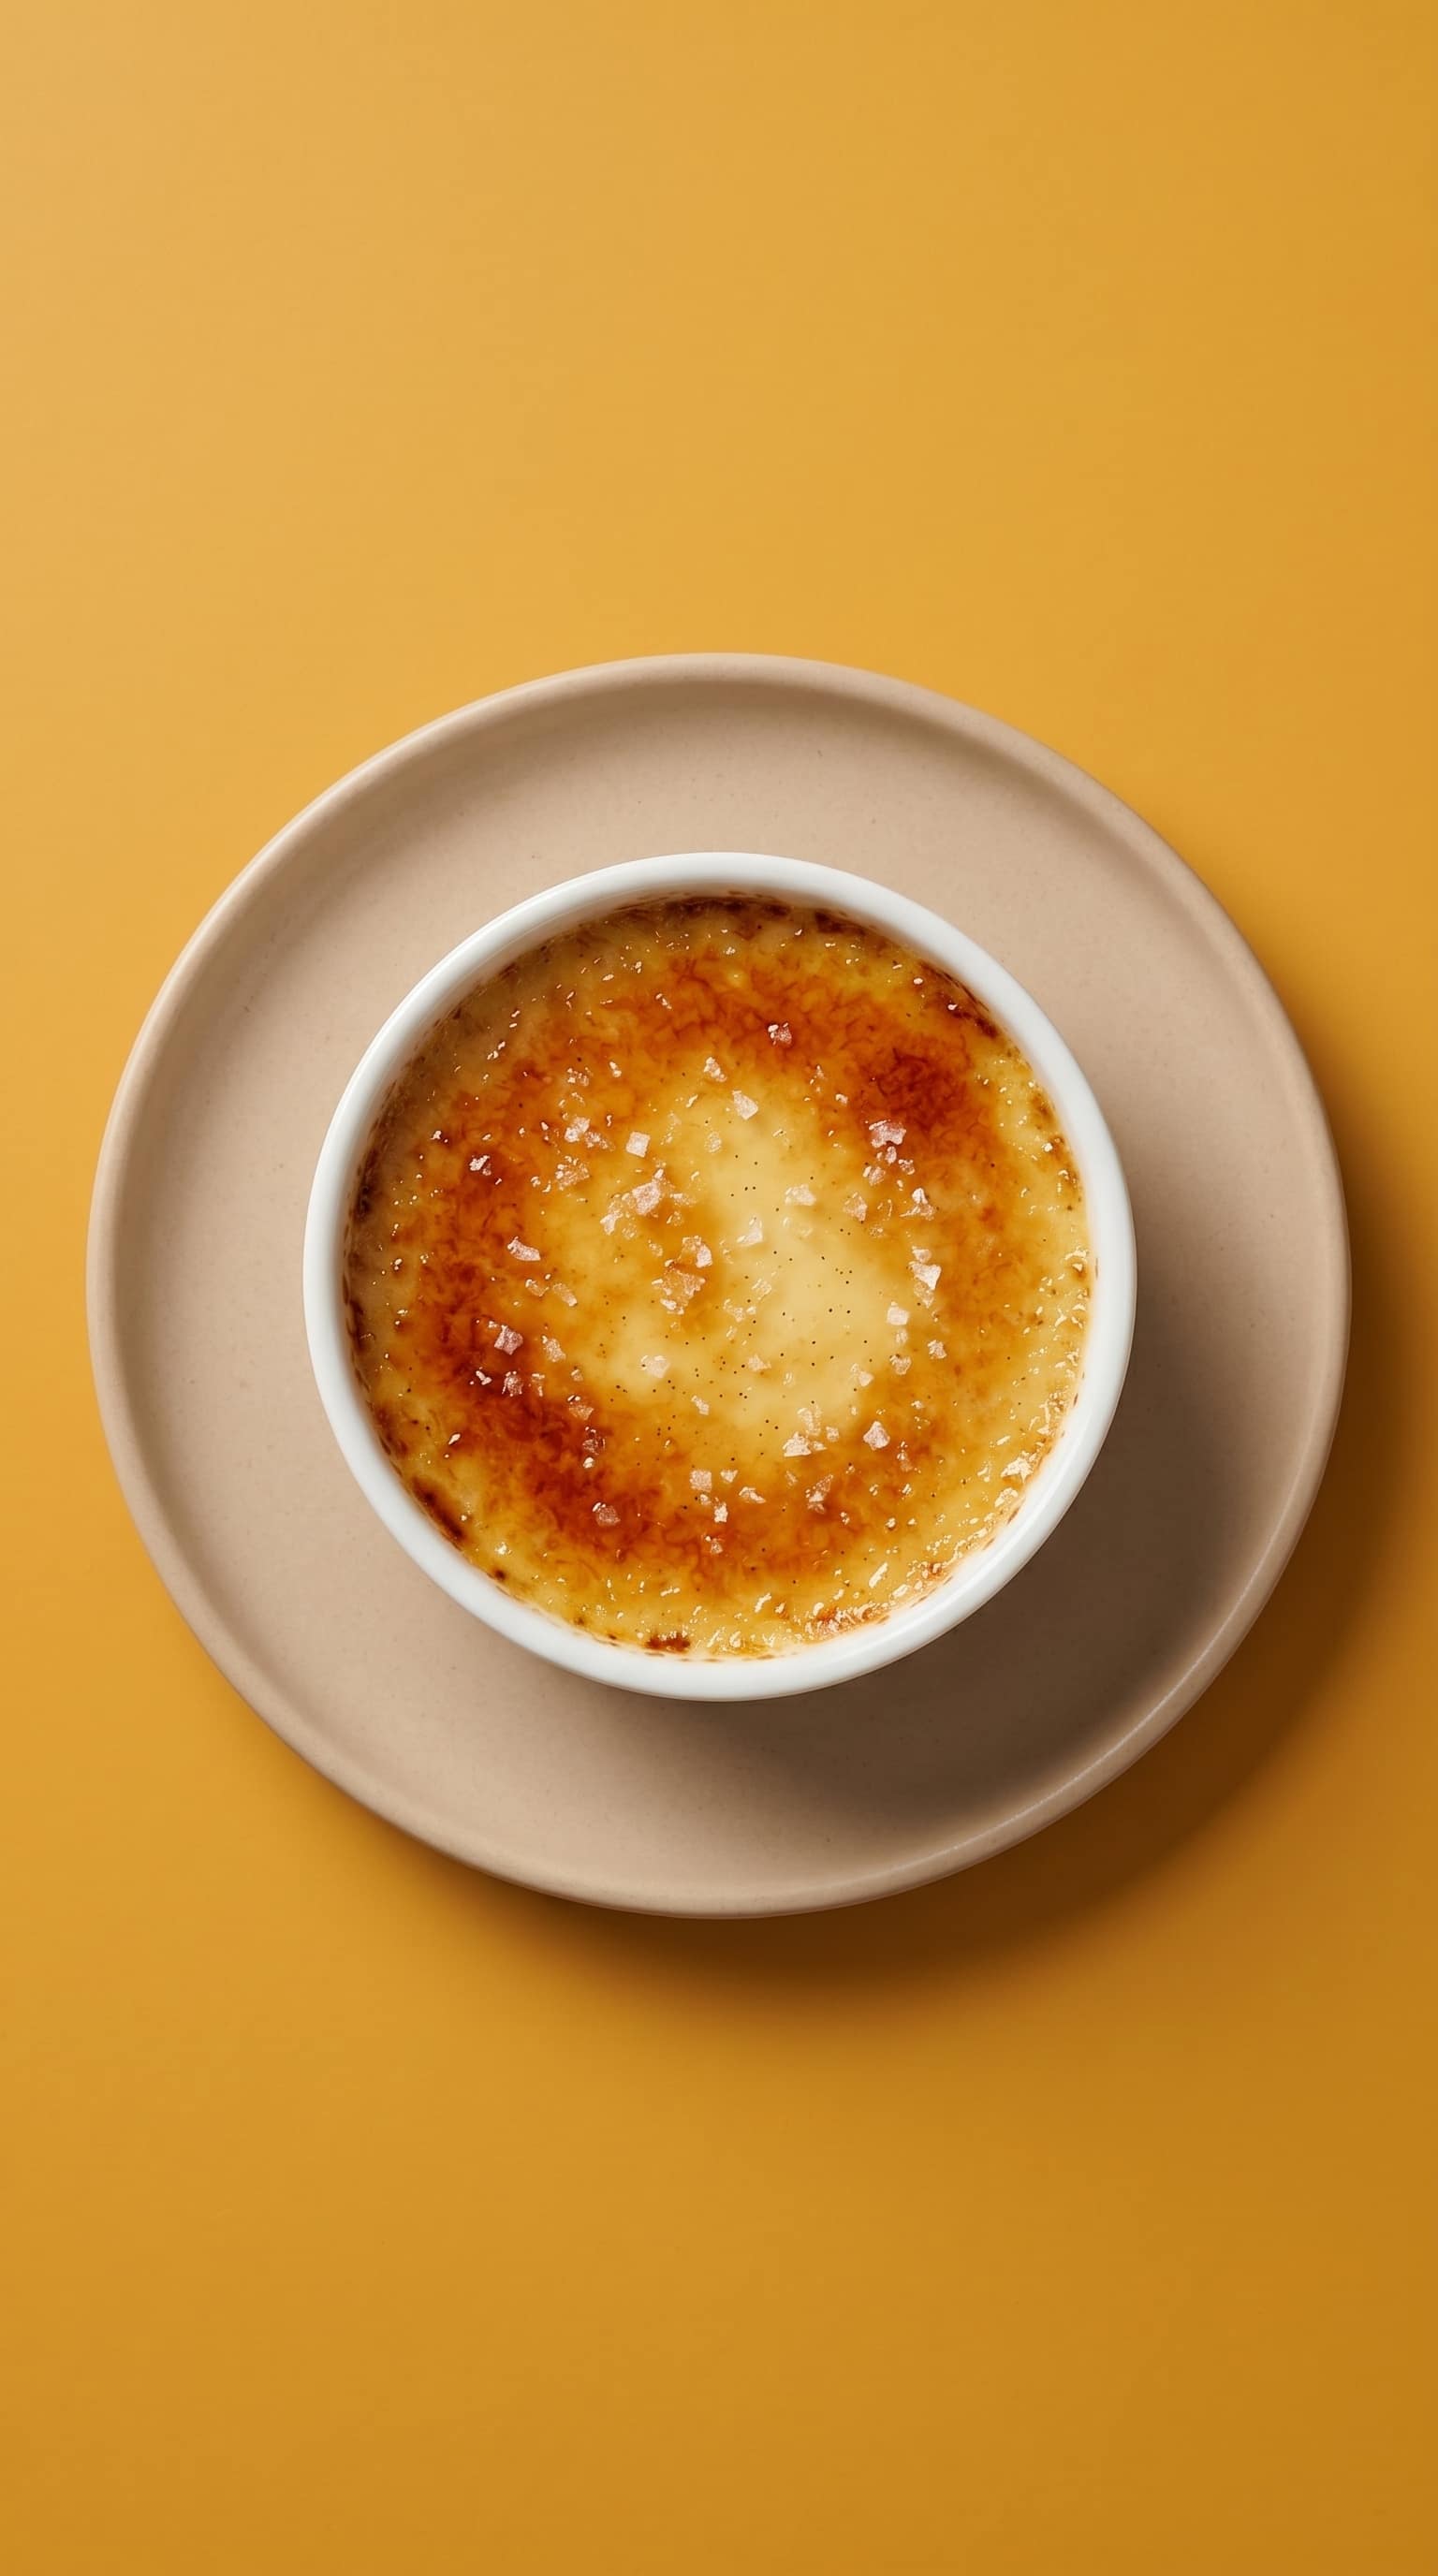
Classic Creme Brulee with Vanilla Bean and Sea Salt
This classic creme brulee is a rich, creamy French dessert topped with a crisp, glass-like sugar crust. By gently warming the cream and slowly mixing it with the eggs, you get a silky texture without any lumps. It takes about 5 hours total, including chilling, and makes 4 servings.
Seared Foie Gras with Mango Ginger Chutney and Star Anise Jus
This classic French appetizer pairs a perfectly seared foie gras escalope with a sweet-tangy mango ginger chutney and a fragrant star anise jus. The secret is a smoking-hot dry pan and just 60 to 75 seconds of total cooking time. Serves 6 as a starter and comes together in about one hour.
Moelleux au Chocolat, a Classic French Molten Chocolate Cake with Yuzu
This classic French molten chocolate cake has a perfectly set outside and a warm, runny center. A single tablespoon of yuzu juice lifts the rich chocolate with a bright, floral citrus note. Make the batter up to a day ahead and bake in just 10 to 12 minutes. Serves 4.
Classic Creme Brulee with Vanilla Bean and Sea Salt
This classic creme brulee is a rich, creamy French dessert topped with a crisp, glass-like sugar crust. By gently warming the cream and slowly mixing it with the eggs, you get a silky texture without any lumps. It takes about 5 hours total, including chilling, and makes 4 servings.